4.9 Sharpening⧉
PS2 implements box/Gaussian blur, gradients, sharpening, and the bilateral filter. → Problem sets (appendix).
Almost every camera, every editor, every phone "enhance" button reaches for it: make the picture crisp. Where the previous chapter blurred — mixing a pixel with its neighbors — sharpening does the opposite, accentuating how a pixel differs from its surroundings, so edges snap and texture pops. It is the inverse of blur, but it cannot be done by simply running blur backwards. Undoing a blur exactly is deconvolution, an ill-posed inverse problem we defer to a later chapter. Everyday sharpening sidesteps that by going through blur, and because the steps are linear, it is just another convolution.
4.9.1 Linear sharpening⧉
Here is the idea. Blur an image and you are left with its slow, smooth variations — its low frequencies. Subtract the blurred version from the original and what remains is everything the blur threw away: the fine detail, the edges, the texture — the high frequencies. Call that difference the detail (or high-pass) image. To sharpen, simply add the detail back, amplified:
In words: take the image, compute how much it exceeds its own blurred self at each pixel, and push it that much further — by a factor $k$ that controls the strength. Where the image is already smooth, $\text{in} - \text{blur}(\text{in})$ is near zero and nothing happens; where there is an edge or fine texture, the detail is large and gets boosted, so edges gain contrast and the image reads as sharper. Push $k$ too high and it over-sharpens — you can absolutely overdo it. This is the unsharp mask, the standard sharpen in every editor.
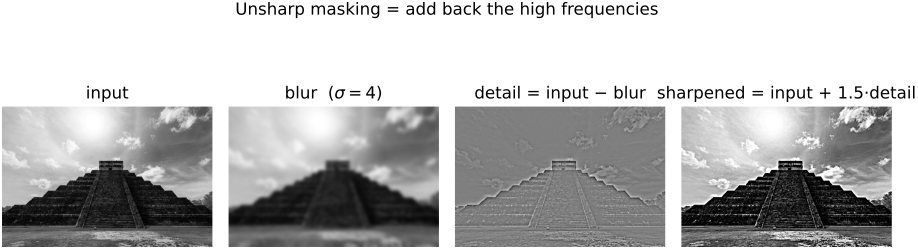
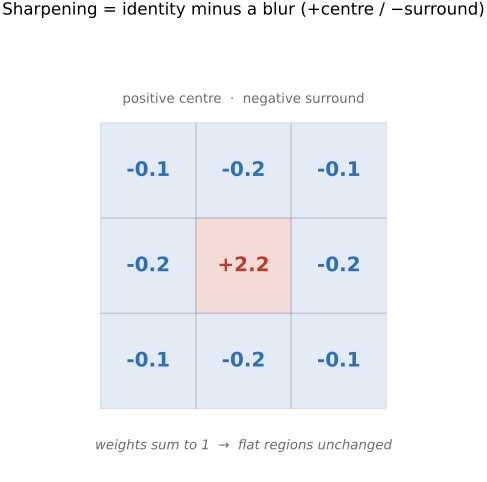
Because each step here is linear, the whole sharpening operation is itself a single convolution — a tidy illustration of associativity carried over from the convolution chapter. Writing the blur as a kernel $g$ and the impulse as $\delta$, the sharpening filter is
a kernel that is a positive spike at the center (greater than 1, to boost the pixel) surrounded by a negative ring (to subtract the neighbors). That $\delta - g$ shape — center positive, surround negative — is the signature of sharpening, with a clean intuition: it amplifies the difference between a pixel and its neighbors. (Many such kernels exist, just as there were many blurs; this is the canonical one.)
4.9.2 Why it's called "unsharp mask"⧉
The name is a darkroom relic, and it is worth a moment because it explains the otherwise puzzling word unsharp in a sharpening tool. Before digital, photographers sharpened a negative by sandwiching it with a slightly blurred, low-contrast positive copy — an "unsharp mask" — held a hair out of focus against the original. Where the two disagreed (at edges), the sandwich let extra light through, boosting edge contrast; where they agreed (flat areas), they canceled. That is exactly $\text{in} - \text{blur}$, done in silver instead of arithmetic — the blurred copy is the "unsharp" mask — and the name stuck into the digital age, where the same subtraction is now a line of code.
4.9.3 Sharpen in gamma, linear, or log?⧉
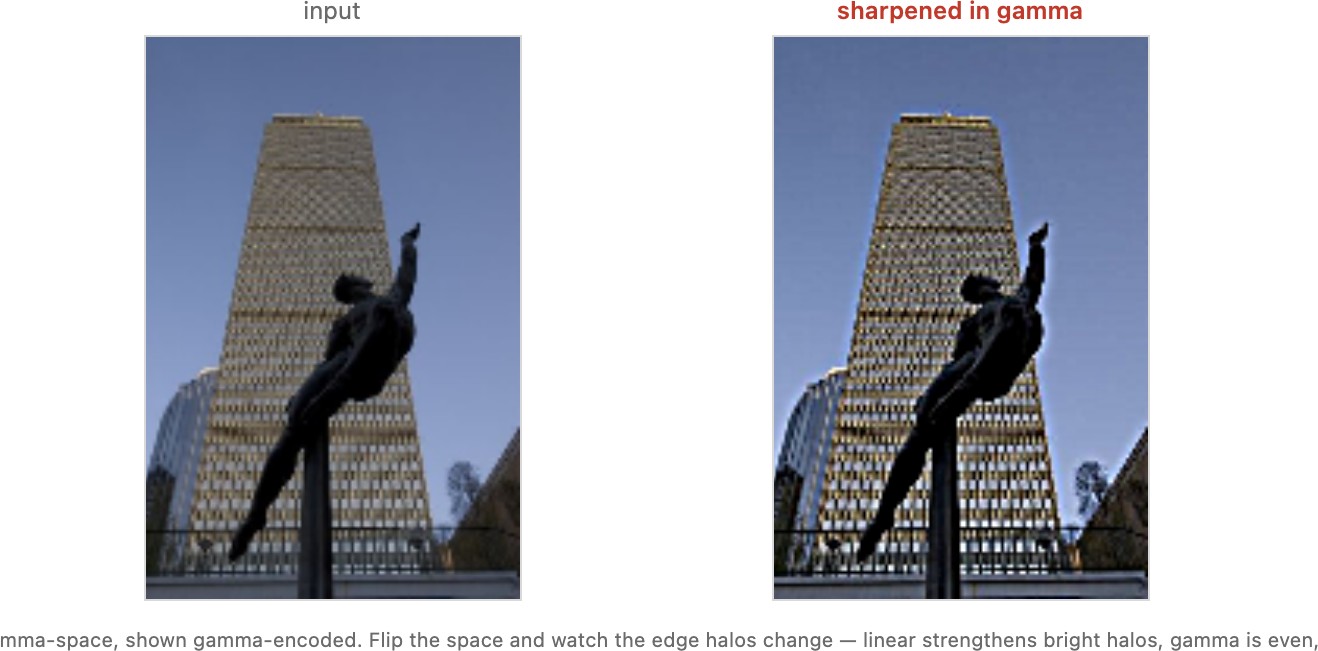
There is another choice in that formula that most people never make consciously: in what space do you compute the subtraction? The unsharp mask is a weighted difference — original minus a blur — and a blur is an average. We already know from tone mapping and from color that an average depends on the space you take it in: the mean of two pixels is not the same number in gamma-encoded values, in linear scene radiance, and in log. So the same unsharp mask, with the same radius and strength, gives three different results depending on whether you apply it to the raw gamma values your file stores, to the linear light those values decode to, or to the log of that light.
The difference shows up where it matters most — at a high-contrast edge, where the halo lives. In linear space the overshoot and undershoot happen in physical light, so a bright edge throws a strong bright halo and only a weak dark one (radiance has lots of room to shoot up and a hard floor at zero). In gamma space the encoding already compresses the highlights, so the halos come out perceptually more even, bright and dark roughly matched. Log space goes further still, gentlest in the highlights and firmest in the shadows, because it treats equal ratios alike. There is no single correct answer: gamma is the common default (it is what editors do when they sharpen the stored pixels), linear is the physically faithful one, and log tracks the eye — but they are visibly different, which is exactly why it is worth seeing rather than taking on faith.
4.9.4 Non-linear sharpening⧉
Linear unsharp masking is the standard sharpen, and it has two failure modes that motivate everything left in this chapter.
First, it amplifies noise. In a flat region — a clear sky, a smooth wall — there is no real detail, so $\text{in} - \text{blur}$ is mostly noise. Boost it and you boost the noise, turning a clean sky grainy. Second, it haloes at strong edges. Near a high-contrast boundary the detail image swings strongly positive on the bright side and negative on the dark side; amplify that and you get a bright fringe along one side of the edge and a dark fringe along the other — the tell-tale "halo" of an over-sharpened photo. Both failures appear on a real photo as the gain $k$ is pushed up (Figure 4.9.4): a scanline across a strong edge shows the boosted detail overshooting into a bright/dark ring, while the smooth background turns gritty.
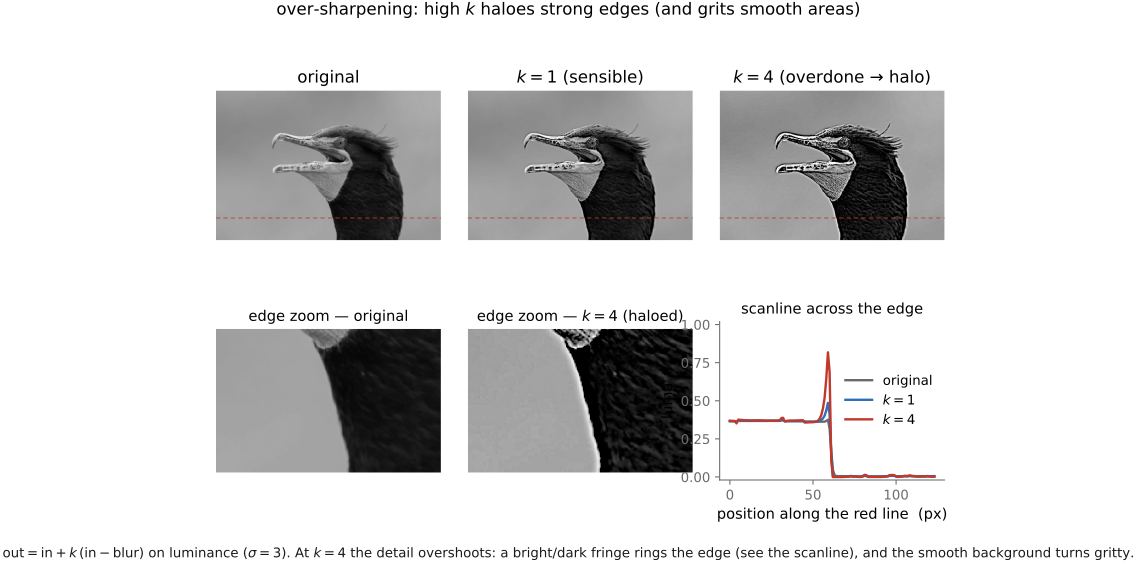
Both failures share a root cause: linear sharpening is blind to context. It applies the same boost everywhere, whether the local variation is meaningful detail or meaningless noise, whether the edge is gentle or violent. The fix is to make the sharpening adaptive — to gate the boost by what is locally happening: sharpen hard in textured, detailed regions where there is real structure to enhance, and back off in smooth regions (where the boost would only amplify noise) and at the most extreme edges (where it would only halo). One can steer the gain by local edgeness or intensity; the cubic and rational variants (Ramponi 1998) and the adaptive-control scheme of Polesel, Ramponi & Mathews (2000) — whose whole thesis is that an adaptive filter should enhance high-detail areas and leave smooth ones nearly alone — are the canonical references. Real editors fold in the same wisdom: apply sharpening mostly to luminance (not chrominance, where it just colors the noise), only in midtones (to avoid haloing the black and white points), and only near edges. We will give the principled version in the edge-preserving part.
The fastest way to feel both the linear failure and its non-linear fixes is to drive them, watching a scanline through the image (Figure 4.9.5).
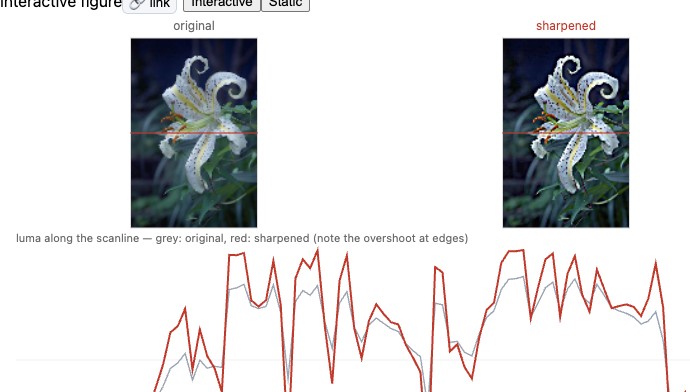
But notice what "gate the boost by local edgeness" really demands. It asks the filter to know whether two nearby pixels belong to the same surface or straddle an edge — to treat neighbors differently depending on how similar they are. That is precisely the capability a plain convolution lacks, because a convolution reuses the same weights everywhere by definition. To get it, we must break shift-invariance on purpose — weighting each neighbor by how similar it is, not just how near. That is the edge-preserving idea (the bilateral filter and its relatives), and it is important enough that the EDGES MATTER part is built around it; we develop it properly there (Bilateral filtering), where the same affinity principle also drives local tone mapping, matting, and colorization. Here we only need the takeaway: linear sharpening's two failures — amplified noise and edge halos — are what motivate leaving convolution behind.
There is a second thread worth flagging before we move on. Push detail enhancement to its limit — not merely amplifying the faint high frequencies that survive, but inventing plausible detail the optics and sensor never recorded — and you are no longer sharpening at all but doing super-resolution, a learned, prior-driven inverse problem (you cannot get information back without assuming what natural images look like). Non-linear, content-aware sharpening is the gentle first step on that road, taken up in full in Super-resolution.